This Guide describes an example of an Auto-Attendant design and setup in turboDial. The video at Auto-Attendant How To Guide should be watched carefully before proceeding. This Blog post will cover the following steps to implement an Auto-Attendant:
It is important to think about what kind of information your callers need, what a receptionist would typically do when receiving calls, and how to categorize and automate the receptionist function. As part of your plan, each Auto-Attendant Extension must cause one or more of these actions when it is selected: play a message, trigger an API Goal, and/or transfer the call to another number.
Consider the following questions to help lay out an Auto-Attendant plan.
Organize your plan in a table showing the options you will offer a Caller when they reach your Auto-Attendant. List your Extensions in a logical order and assign a number to each of them. The table will include each Extension with one or more action:
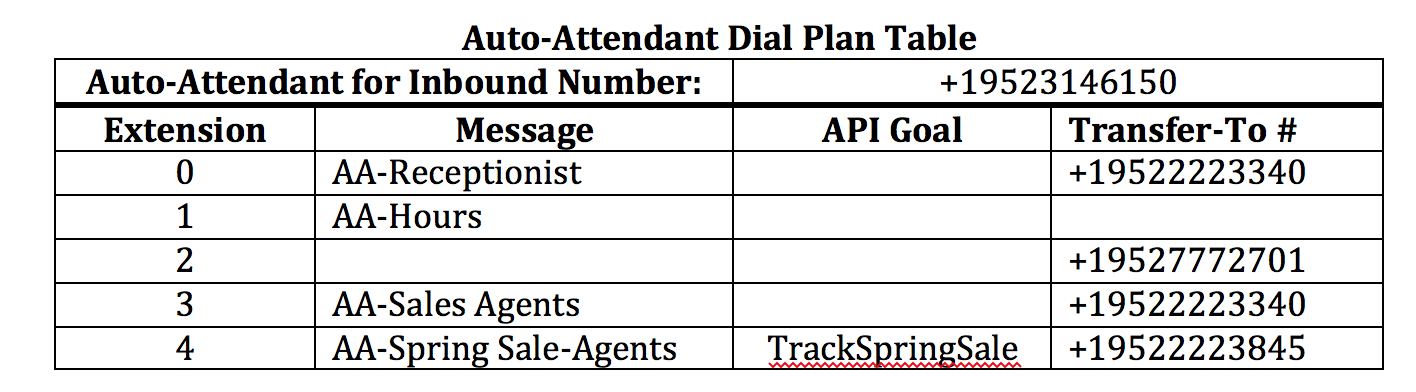
The following is an example design:
This table is provided with blanks for you to fill in as you design your Auto-Attendant at turboDial Auto-Attendant Template. You may find it useful to keep this table available for reference, or if your Auto-Attendant design needs to change.
In this design, choosing Extension 1 plays the recording that states your business Hours and then the call is terminated, so there is no need for a Transfer-To #.
Extension 2 does not have a message, and the call is transferred to the designated number.
This design shows how one person may perform multiple functions, and so the Transfer-To number is the same for two different extensions, as shown above for extension 0 and 3 where the phone number is the same for both Receptionist and Sales Agents.
Extension 4 is a temporary Inbound number for the duration of the Spring Sale promotion. The API goal can be used to add a tag to contact records to enable report production.
This step involves writing scripts for your Greetings and Messages, and Recording them.
The next step is to create scripts that can be read out loud while recording your Auto-Attendant Greetings and messages. You will find that reading your scripts will produce a better result than trying to remember what you want to say while recording.
The Greeting is a pre-recorded message associated with the Inbound number and usually provides information about the Extensions they may choose from. You may have two Greeting messages – one for known callers who have a Contact record in Infusionsoft, and you may also have a different recorded message for unknown callers.
Each Extension may have an optional pre-recorded Message that confirms the choice they made and may provide additional information.
The following are example scripts.
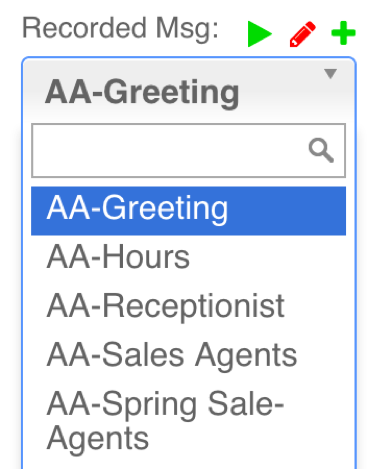
AA-Greeting
Thank you for calling ACME Sales. Please press 1 for our Hours. Press 2 to place an order. Press 3 to speak with one of our sales agents. Press 4 for information on our Spring Sale. For all other calls, please press 0 and you will be connected with our Receptionist.
Extension 0: AA-Receptionist
You will now be transferred to the Receptionist.
Extension 1: AA-Hours
Our business hours are Monday through Friday, from 8:00 AM to 5:00 PM Central Standard Time.
Extension 3: AA-Sales Agent
You will now be transferred to one of our Agents.
Extension 4: AA-Spring Sale-Agents
You will now be transferred to one of our Agents who can tell you about our Spring Sale.
Record your Greeting and Messages using the “Recorded Msg” section of the turboDial panel. The picture below shows the screen where recordings are made and saved, from the right hand lower panel of turboDial:
You have done the planning, design and recording preparation for the Auto-Attendant and are now ready to implement the plan in turboDial. This section will walk through the Auto-Attendant Setup screens. As we go through this, it will be helpful to refer to the Auto-Attendant Dial Plan Table from the example design above.
Choose and Configure an Inbound Number – In this example, we are using the number +19523146150, which has already been acquired in turboDial. On the right side of the turboDial panel – Inbound & SMS, click on the red pencil.
Extension 0.
1. For the Message, choose “AA-Receptionist”.
2. Do not set Goal Call Name.
3. Set Transfer-To # to: +19522223340.
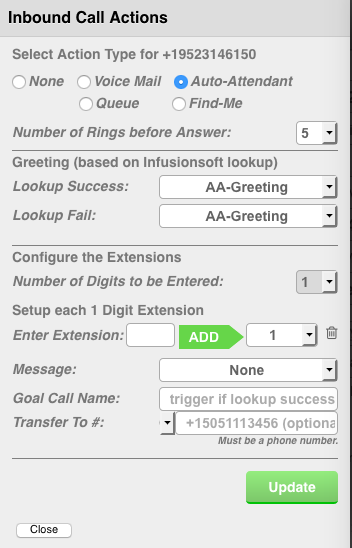
Extension 1.
1. Add Extension 1.
2. For the Message, choose “AA-Hours”.
3. Do not set Goal Call Name.
4. Do not set Transfer-To #.
The following shows a screenshot of this setup.
Extension 2.
1. Add Extension 2.
2. Do not choose a message.
3. Do not set Goal Call Name.
4. Set Transfer-To # to: +19527772701.
Extension 3.
1. Add Extension 3.
2. For the Message, choose “AA-Sales Agents”.
3. Do not set Goal Call Name.
4. Set Transfer-To # to: +19522223340.
Extension 4.
1. Add Extension 4.
2. For Message choose “AA-Spring Sale-Agents”.
3. Set Goal Call Name to “TrackSpringSale”.
4. Set Transfer-To # to: +19522223845.
G. We are now finished setting up the Auto-Attendant for the Inbound number, so we can click Update to save the setup.
H. Click Close.
We recommend testing this by making calls to the Inbound number and choosing each Extension in turn, to verify that your design operates as you planned and is easy for the caller to navigate.
Categories
Submit a Comment