turboDial is a voice and text messaging app designed to work directly with Infusionsoft. You must use your valid Infusionsoft ID when prompted to log in to turboDial.
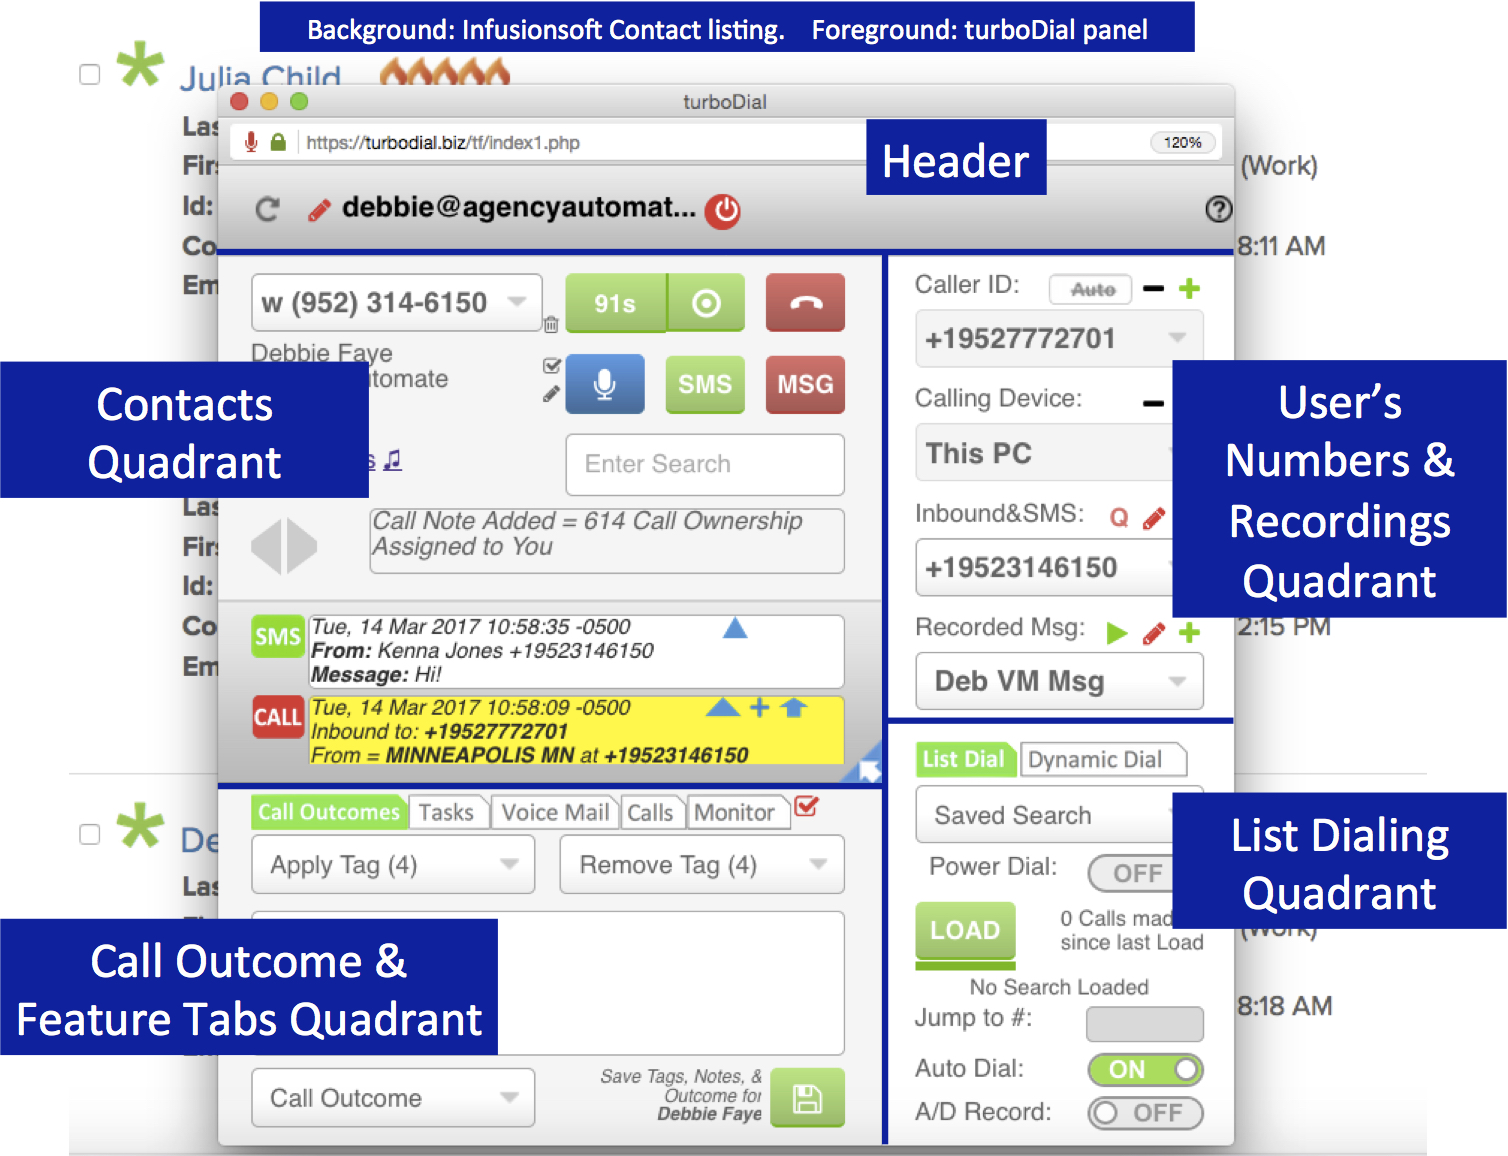
The turboDial Panel window is divided into the Header and four Quadrants. Scroll down to read more about each part.
This first image uses the turboDial Panel window overlayed on an Infusionsoft contact search results listing to depict the components of turboDial.
Color Coding Legend
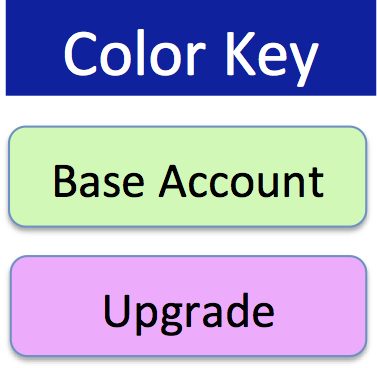
The turboDial Base Account comes with many features, shown using the light Green color.
There are optional upgrades available, and each upgrade package has separate pricing. Upgrade features are shown using the light Purple color.
The description bubbles that follow below are color-coded to indicate whether the feature is available in the Base Account or in an Upgrade.
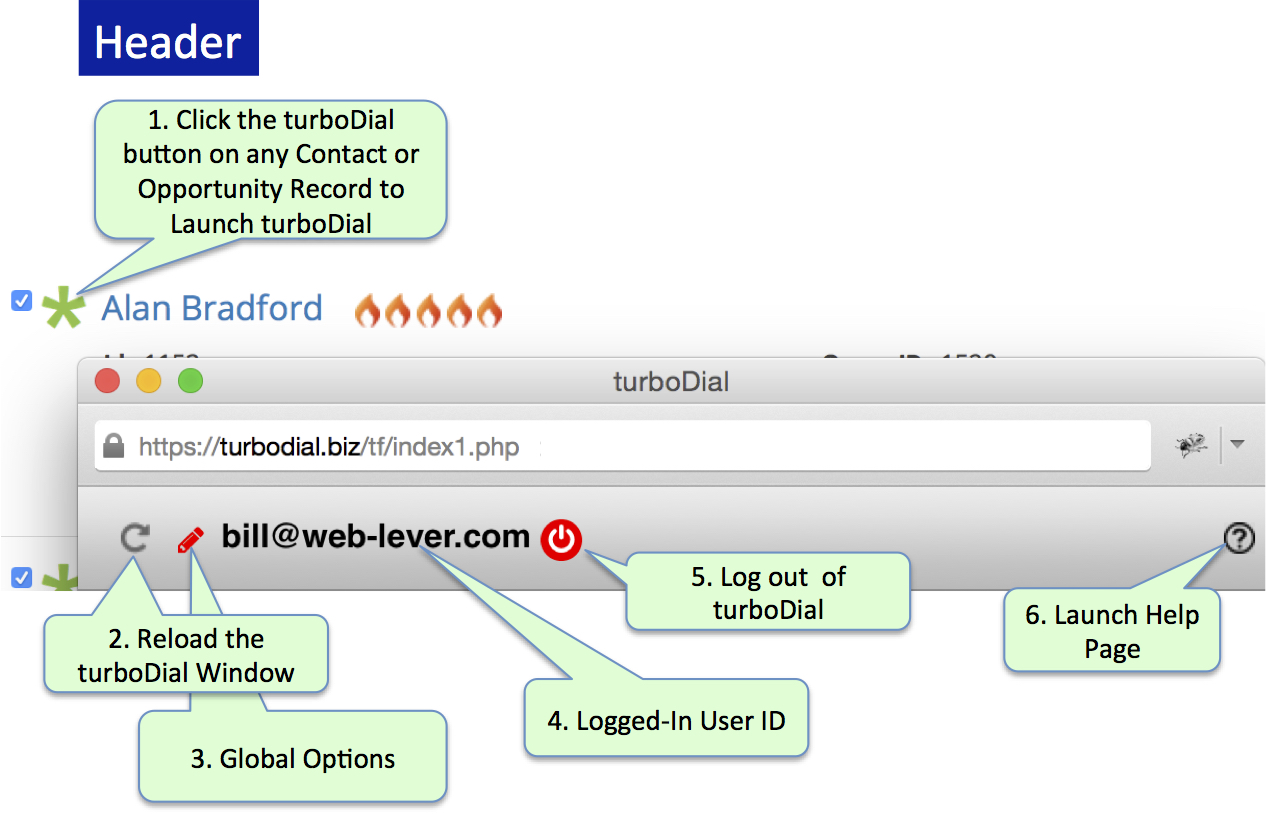
Header
The Header contains basic information for starting a turboDial session such as the HTTP address and login information for turboDial.
Click for Details
- Click the turboDial button on any Contact or Opportunity to Launch turboDial. After you install the turboDial Linker browser extension in your Firefox or Chrome browser, you will find the green turboDial button available on Infusionsoft Contact Records and Listings, and Opportunity Records and Listings. Clicking the button launches turboDial if it was not previously launched. Or it re-focuses turboDial on the selected Contact.
- Reload the turboDial Window. If you encounter any broken displays, missing information or inoperable buttons on the turboDial window please click the reload button and try again.
- Global Options. If you are the owner of the turboDial account then you will see this button for accessing a panel of configuration controls that affect all Users in your account. For more information on the list of options, see Global Options.
- Logged-In User ID. Your turboDial logged-in User ID is displayed here.
- Log out of turboDial. Click the Logout Button when you are done using turboDial. Clicking the Logout Button will terminate any call in progress and log out the current turboDial session. You will need to login again before resuming use of turboDial. At logout, turboDial will attempt to remember all current settings and restore them the next time it is launched.
- Launch Help Page. Clicking the help button launches this page.
Contacts Quadrant
The Contacts Quadrant provides information and controls to communicate with Infusionsoft Contacts via turboDial and update Infusionsoft Contact records. Calls may be made to any Contacts in Infusionsoft, or any number may be called using the Dial Pad. This quadrant is further divided into two panels: the upper part which is the Communications panel and the lower part which is the Alerts panel.
This Communications Quadrant section is explained first for the Base Account features, and second explains additional features that come with Upgrades in the Alerts panel.
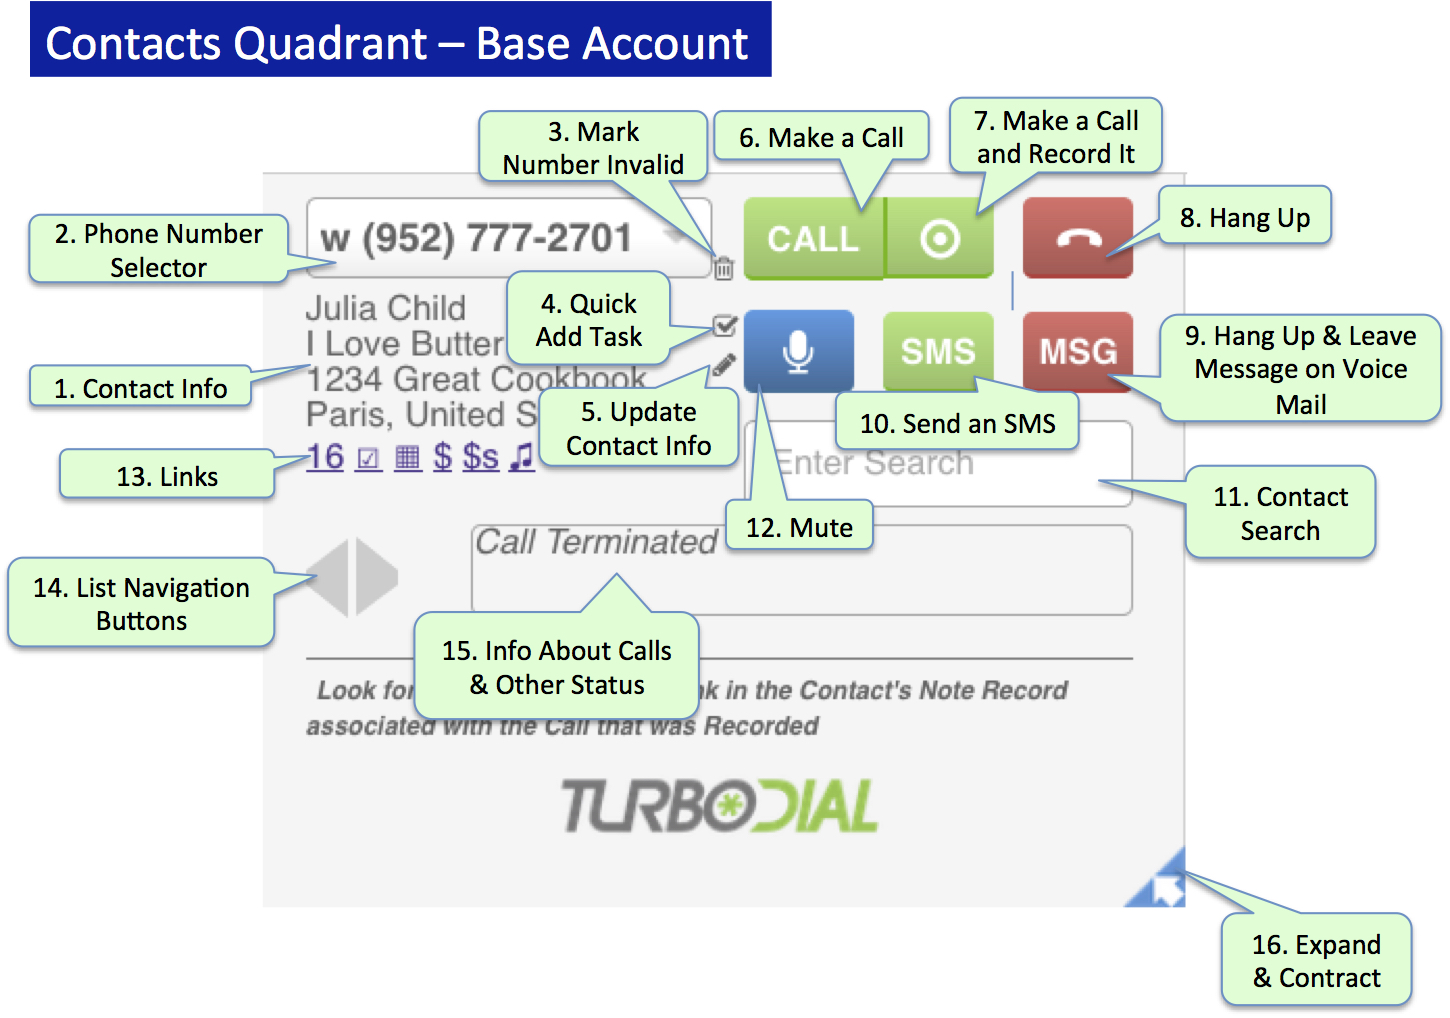
Contacts Quadrant – Base Account
Click for Details
- Contact Info. The name, company and address information for the currently focused Infusionsoft Contact Record appears here.
- Phone Number Selector. The current Contact’s phone numbers are available in this list, and you can select the number you wish to call.
You can also choose “Enter Number” from this list and the call you place will dial the number entered in the Search field.
- Mark Number Invalid. The selected phone number will be set to type=Invalid for that Contact in your Infusionsoft Account. Invalid numbers are not displayed in your phone number selector in turboDial. For more information, see Global Options.
- Quick Add Task. The Quick-Add Task button can be used to quickly add a new task for the current contact. For more information, see Global Options.
- Update Contact Info. A form will be opened with the current information for the Contact. You can modify fields in the form as needed then click the “Update” button to save your changes into the Infusionsoft copy of the Contact Record. For more information, see Global Options.
- Make a Call. Pressing this Call button will begin a call to the number displayed in the selection on the Phone Number Selector. During the call this button becomes a timer of the call.
If the Calling Device in the Logged-In User Quadrant is set to ‘This PC’ then your end of the call will use the microphone and speakers of your PC. Please use a good quality headset and make sure your Internet connection performs well.
turboDial users can also choose to place the call from a phone device. In that case when the Call button is pressed your phone will be called first and upon answer you will be connected to the other person. Note that it is extremely important to answer the call to your device – if you don’t answer and your voice mail system answers instead then your voice mail system will be connected to the person you were calling. If you have changed your mind and don’t want to continue the call then you should first answer the call to your device and then hang up.
- Make a Call and Record It. This Call & Record button is the same as the Call button, except the call will be recorded and the recording will be available in the Call Recordings list in the Notes & Recordings Quadrant.
- Hang Up. Press the Hang Up button to disconnect a call normally. A note documenting the call will be automatically placed on the Contact Record for the Contact shown in the Contact Info field unless the call was placed to the number in the Dial Pad window, in which case you will be prompted to approve the note before it is applied.
This button will also terminate the recording or play-back of a recording.
- Hang Up & Leave Message on Voice Mail. The “Hangup & Leave Message” button is a great way to save time and improve sales success. When your call is answered by an answering machine you can wait for the beep then press this button to automatically play the recording selected in the Leave Message recording field (see the User’s Phone Numbers & Recordings Quadrant) into the answering machine. Your end of the call will be disconnected when you press this button and you can proceed to place your next call.
- Send an SMS. Click the SMS button to view the panel for composing and sending SMS messages, and to review the most recent 10 SMS messages sent to or received from this contact.
- Contact Search. The Search field provides 2 functions:
A) It is a Contact Search tool that provides a quick method to switch turboDial to a different contact. Type a search string in this field and press the enter key. If one contact matches your search then turboDial will immediately switch to that contact. If more than one match your search then a list of contacts will popup and you can choose the one you want.
Your search string can be a first name, a first name and last name, a phone number or an email address. And you can use the ‘*’ character (asterisk key) as a wild card to match any characters.
B) It is a field where a phone number can be entered to dial manually. When the Phone Number Selector is set to “Enter Number” the number you have entered into this Search field will be used as the number to call when the Call button is pressed.
- Mute Button. The Mute Button can be used to silence your microphone for calls placed using ‘This PC’. When muted, the person you called will not be able to hear you but you will still hear them. Press the button again to un-mute.
This button is not used for calls placed from phone devices.
- Links. This is a set of clickable links that launch the following actions for this contact. For more information see Quick Links.
- The Contact ID Number: open the contact record in a new window
- A check mark symbol: open a window to create a new task
- A grid symbol: open a window to create a new appointment
- A dollar sign: open open a window to create a new opportunity
- A double dollar sign: open a window to view the contact’s current opportunities
- A pair of musical notes or the letter N: open a window to view the contact’s current notes
- List Navigation Buttons. These Right and Left Arrow buttons are used to move forward and backward within the currently loaded Saved Search list. If no list is loaded then these buttons are disabled.
- Info About Calls & Other Status. This window displays current information about the call and other activities you perform with turboDial.
- Expand & Contract. This button expands and contracts the turboDial window. When contracted, only the Contact Dialing Quadrant and Call Outcome & Feature Tabs Quadrants are visible (the left side of the turboDial panel).
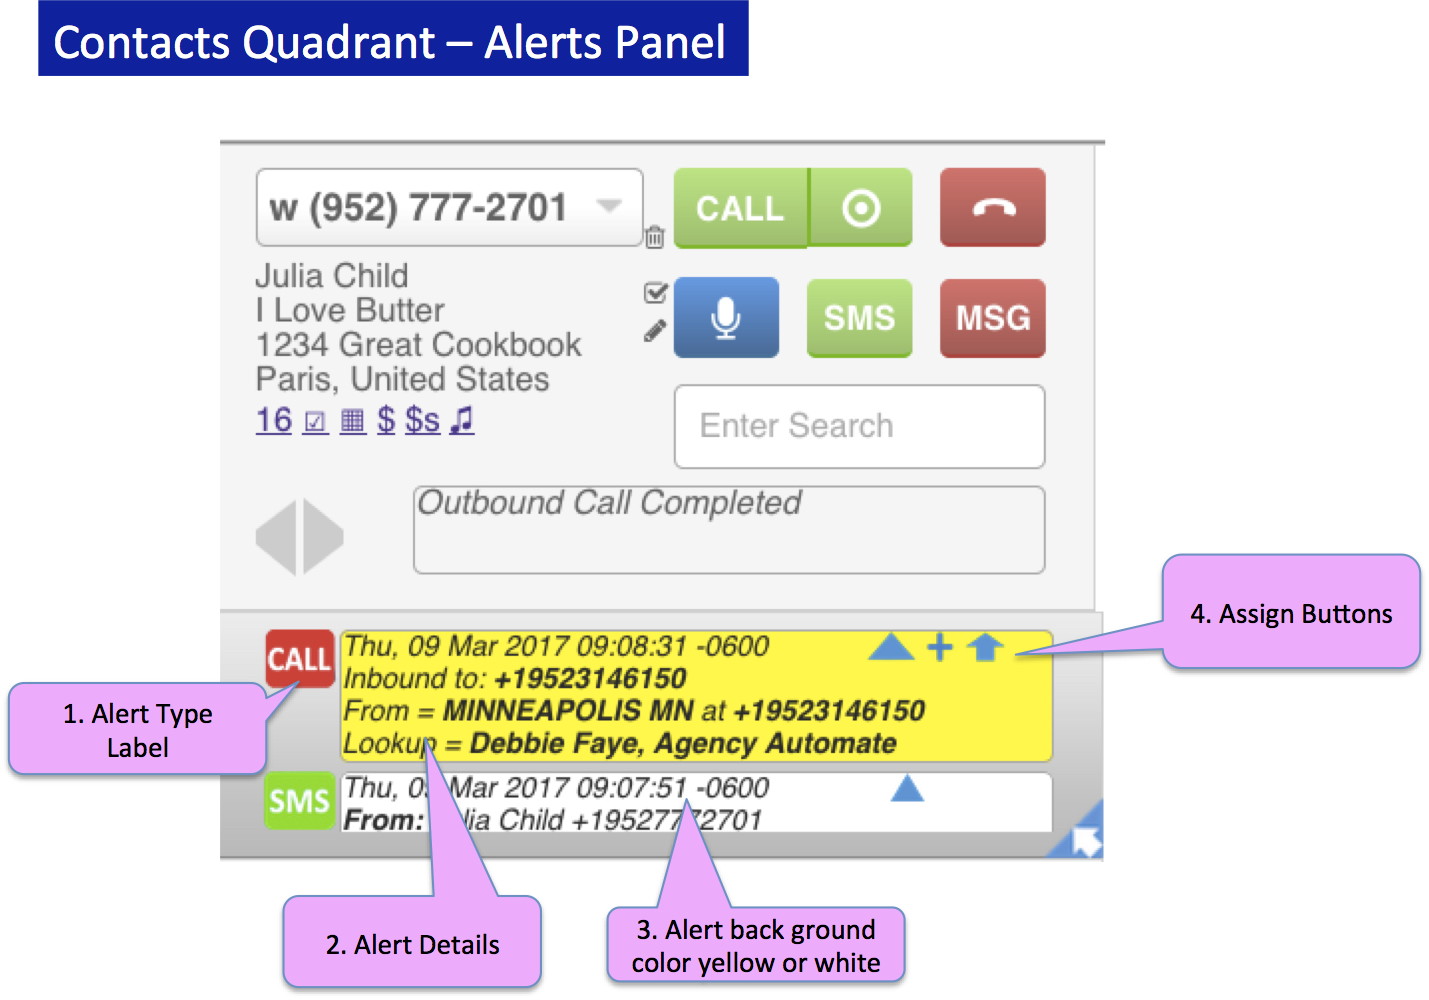
Contacts Quadrant – Alerts Panel
The Alerts Panel in the Contacts Quadrant is used with Upgrades to provide information and take action for the different types of calls.
Click for Details
- Alert Type Label.
- SMS (Green) – An SMS message has been received. Clicking that button will launch the SMS View & Send panel to enable further text messaging communication with the contact designated in the SMS alert.
- HOT (Gold) – A Hot Lead Alert has been triggered from an Infusionsoft campaign. For more information, see Hot Lead Alerts.
- CALL (Red or Black) – Red for an Outbound call, Black for an Inbound call.
- ANS (Blue) – A call has been answered from a Power Dial calling session (also applies to Dynamic Dial – coming soon). For more information, see Power Dial
- ICOM (Blue) – An Intercom call has been received. For more information, see Hosted Voice.
- Alert Details. Identifies information such as Date, Time, and Caller Name.
- Alert back ground color yellow or white. The Alert background color starts out Yellow when new, and turns White when clicked to denote that it has been read.
- Assign Buttons. This information is also contained at Assign Buttons.
- Blue Triangle: View. Click this button to view the Contact who has been assigned. Assign yourself as the note owner. But, if it is already assigned to a User, then it will not be reassigned to you.
- Blue Plus sign: Add. If the note is not assigned to a Contact (or assigned incorrectly) and the Contact does not exist, then click on this Add button to create the Contact and assign the note to that new Contact. The Add button will also assign yourself as the note owner.
- Blue Up Arrow: Re-Assign. If the note is not assigned to a Contact (or assigned incorrectly) and the correct Contact does exist, then click this Re-Assign button to change assignment of the note to the currently viewed Contact. The Re-Assign will also assign yourself as the call note owner.
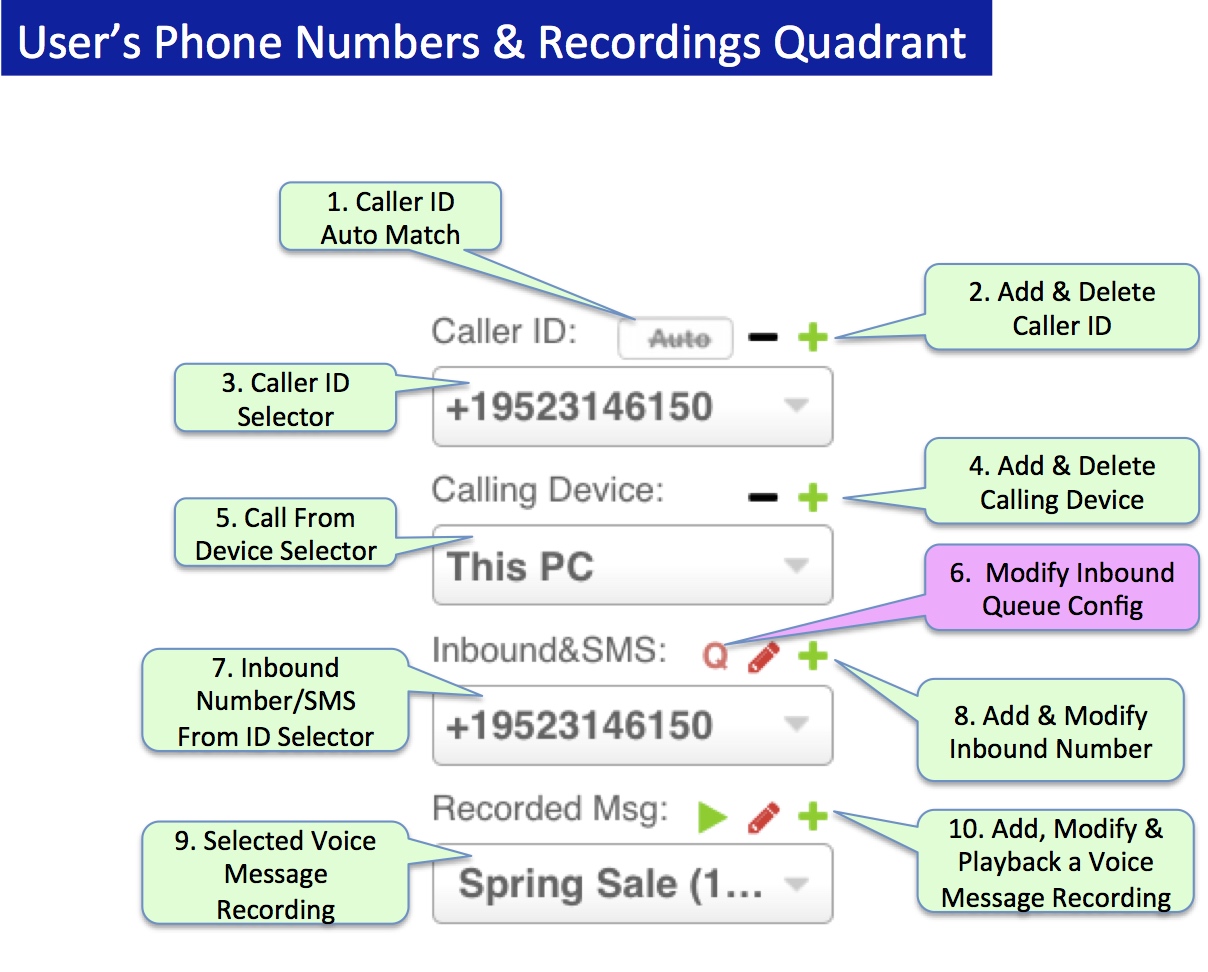
User’s Phone Numbers & Recordings Quadrant
The User’s Numbers & Recordings Quadrant allows the User to choose how their calls are configured and how they appear to Contacts. This includes choosing Caller ID and devices, and managing recordings.
Click for Details
- Caller ID Auto Match. The “Auto” button activates the “Caller ID Auto Match” feature. This feature attempts to substitute a Caller ID Number that matches the area code of the number you are calling.
- Add & Delete Caller ID. Twilio requires all calls to be placed using a valid Caller ID number, and that number is displayed to the people you call.
(Note that you will not be able to place calls until you have added at least 1 Caller ID number.)
You can add and validate a new number with Twilio by pressing the + button, and delete an existing Caller ID with the – button. Numbers validated in this list are available to all Users in your turboDial account.
When the + button is pressed you will proceed through the following steps:
- You will see a window where the phone number to be validated is to be entered. Enter the number and submit. (You can also include an extension by following your number with a blank space and then an x followed by the extension, e.g. +13125551212 x123)
- You will see a new window with a 6 digit validation code.
- The phone associated with the number you entered will ring, and you should answer it.
- You will hear a voice asking for the validation code. Enter the code using the phone’s keypad. If you entered the number correctly the new phone number will be accepted by Twilio.
- Press OK to indicate you have finished and to dismiss the instruction window on top of the turboDial window
- The new number should now be available as a choice in Your Caller ID selector and also in the Calling Device selector.
- Caller ID Selector. The Caller ID selector is used to set the Caller ID number that will be displayed on the phone calls you place. Only the Caller IDs that have been validated with Twilio are available in this list. Choose the number you want to display when calls are made. Note, the Auto Match feature may override this selection and use a different Caller ID for your call.
- Add & Delete Calling Device. You can add a device directly to the Calling Device list by pressing the + button, and delete a device by pressing the – button.
Calling Devices are associated to the logged in User and devices you add to this list will not appear for other users in your turboDial account.
You cannot delete a Caller ID from the Calling Devices list; use the – button on the Caller ID list to do that.
You can include an extension in your Calling Device by following your number with a blank space and then an x followed by the extension, e.g. +13125551212 x123 .
- Call From Device Selector. The Calling Device selector offers the options of placing your call from ‘This PC’, from one of the devices whose number you have validated with Twilio, or from one of the devices you have added directly to the Calling Device list such as your office phone. If you choose ‘This PC’ then you will use the microphone and speakers of your computer for the call, and a high quality headset is recommended.
If you choose a phone device then any call you place will begin with a call to your device and when you answer you will be connected to the number you are calling. Be sure to answer this first call before your voice mail system picks up.
- Modify Inbound Queue Config. Opens a configuration screen where you can define which Users are notified when a call is Queued using the Inbound Queuing feature and other Queue configuration details. For more information, see Hosted Voice.
- Inbound Number/SMS From ID Selector. When you send an SMS text message, you must choose a valid Inbound Number from which the SMS will be sent, and the number must be enabled for use as an SMS ID. For more information see Add/Configure/Delete Inbound Phone Numbers.
- Add & Modify Inbound Number. If you are the owner of the turboDial account these buttons will be visible. For more information see Add/Configure/Delete Inbound Phone Numbers.
Clicking the + button will open a panel you will use to search for, select, configure and purchase a new Inbound phone number.
Clicking the pencil button will open a panel you will use to modify the configuration of an existing Inbound phone number.
- Selected Voice Message Recording. Use this selector to pre-set the Recording you want to leave on your contact’s voicemail when you reach an answering machine. Also, the Recording selected here is the one that will be configured when you click the red Pencil button. For more information, see Leaving Pre-Recorded Messages.
This selector is also used for choosing the Dynamic Dial bypass message (coming soon).
- Add, Modify & Playback a Voice Message Recording. Clicking the + button will begin recording your new voice message recording using the device selected in the Calling Device selector.
Clicking the red Pencil button will open a configure window where you can see the owner of this recording, along with the duration in seconds and the date it was created. If you are the owner of the recording you will also see a field for renaming the recording and an option to delete the recording. Lastly, if you are the owner of the turboDial account you will see a field for changing the owner of the recording and a switch to make the recording public or private.
Clicking the Play button will playback the recording using the device chosen in the Calling Device selector.
The add and modify buttons are also used for the following upgrades: Voice Mail greetings (Voice Mail), Auto Attendant greetings and messages (Auto Attendant), and Dynamic Dial bypass messages (coming soon).
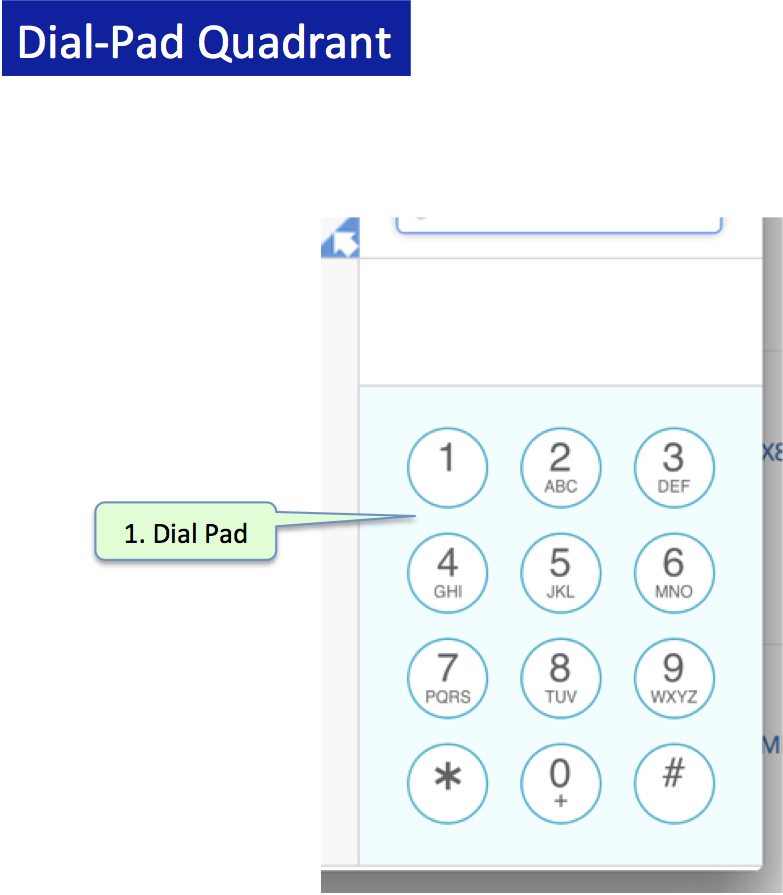
Dial-Pad Quadrant
This quadrant is available when the List Dialing feature is disabled. To enable or disable List dialing, see Global Options.
Click for Details
- Dial Pad. You can enter a phone number to be called using the Dial-Pad buttons, or using the number keys on your computer keyboard. The digits you manually dial will appear in the Search field.
The Dial-Pad is only operational when the background color is light-blue as shown, which can be obtained by clicking on it.
If the Phone Number selector in the Contact Dialing Quadrant is set to “Enter Number” then the number in the Search window will be called when you press a Call button.
You can also use the Dial-Pad to enter the touch tones needed to navigate an automated answering service.
List Dialing Quadrant
The List Dialing Quadrant provides powerful capabilities to increase the efficiency of calling Contacts when working through a list of calls.

Click for Details
- List Dialing Pane. Selects controls for List Dialing.
- Dynamic Dialing Pane. (Upgrade Coming Soon)
- Saved Search Selector. All Contact Saved Searches and Opportunity Saved Searches in your Infusionsoft account are listed in the Saved Search Selector. Choose the Saved Search you wish to load.
- Choose 1-4 to Enable Power Dial. If you have added the Power Dial upgrade, then you can choose a number 1-4 from this selector to activate the Power Dial feature for dialing to your list. With Power Dial, you can share a list in common with multiple calling Agents without colliding on the same contact, and you can call multiple contacts simultaneously and be connected to the first one to answer.
- Load Selected Search. The Load Button will load the selected Saved Search list into turboDial.
- Switch to Quick Load Buttons. This switch brings up a button list of numbers 1-8 which can be used to quickly load a pre-defined Saved Search.
- Jump to Position in List. Enter a list position number into this window and press the Enter key – the associated Contact will be brought up in turboDial. (Not enabled if Power Dial is active).
- Enable Auto Dialing. By setting this switch to On, turboDial will automatically move to the next Contact and begin the call immediately after you save a Note or Call Outcome for the previous call.
- Enable Recording for Auto Dialed Calls. By setting this switch to On, turboDial will automatically record all Auto Dialed calls.
Call Outcome & Feature Tabs Quadrant
The Call Outcome Quadrant provides features to operate on Infusionsoft Tags, Call Outcomes, Notes, and Tasks, as well as manage Calls in progress and Voice mail.
This Call Outcome Quadrant section is explained first for features included in the Base Account, and then for tabs on Tasks, Voice Mail, Calls and My Tasks. The tabs for Call Outcome and Tasks operate on Contact information; and the tabs for Voice Mail, Calls and My Tasks operate on logged-in User information.
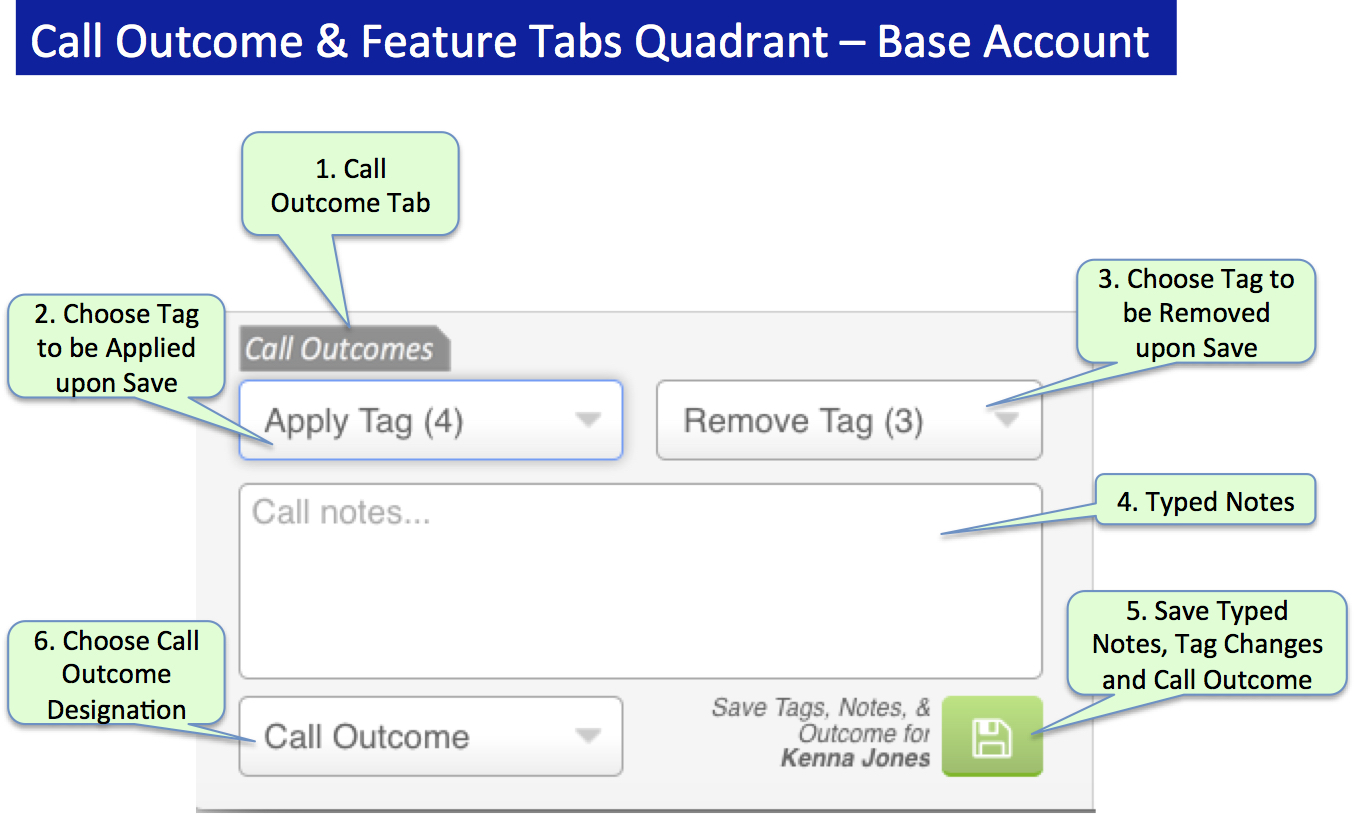
Call Outcome & Feature Tabs Quadrant for Base Account
The Call Outcome Tab operates on the currently selected Contact.
Click for Details
- Call Outcome Tab. Select the Call Outcome Tab to leave Infusionsoft Tag, Note or Call Outcome updates.
- Choose Tag to be Applied upon Save. You can choose a tag from this list and when the Save button is pressed that tag will be applied to the Contact Record.
Your Campaign Tag Goals can be triggered by this action.
The number in parentheses is the count of tags in your Infusionsoft account.
If your list of tags is long you can type some letters into the search window that appears at the top of this list when you click into it, and only tags matching the letters you typed will be shown.
- Choose Tag to be Removed upon Save. The tags currently assigned to this Contact are shown in this list. You can choose one and when the Save button is pressed that tag will be removed from the Contact Record.
The number in parentheses is the count of tags currently assigned to this Contact.
- Typed Notes. You can enter notes in this window before, during and after a call. When you click in this window the background turns light-blue and anything typed on your keyboard will appear here. When you save these notes they are stored into the body of the most recent turboDial Call Note. Each press of the Save button adds the current contents of this window to the same Note until the next call is initiated.
You can also enter typed notes and save them without having made a call to the Contact. In this case a note titled ‘turboDial: Notes’ will be left on the contact record containing the same details as described above.
- Save Typed Notes, Tag Changes, and Call Outcome. Pressing this Save button completes the following:
– Any notes you’ve typed are stored into the most recent turboDial Call Note on the Contact Record for the Contact displayed in the Contact Info section.
– If a value is selected in the Call Outcome selector it is saved into the Call Outcome custom field in the most recent turboDial Call Note.
– If a tag is selected in the Remove Tag field it is removed from the current contact. A tag removal occurs before a tag apply.
– If a tag is selected in the Apply Tag field it is added to the current contact. A tag apply occurs after a tag remove.
You can also apply/remove tags, enter typed notes, and designate a Call Outcome without having made a call to the Contact. In this case a note titled ‘turboDial: Notes’ will be left on the contact record containing the same details as described above.
- Choose Call Outcome Designation. The Call Outcome is a tool for categorizing a call into categories you’ve customized for your business. This selector is enabled if your Infusionsoft account has a custom field named ‘Call Outcome’ in the Task/Appt/Note context. That custom field must be of type ‘Dropdown’ and the dropdown values you specify in Infusionsoft are replicated as choices here. See the Call Outcome Designation page for more information on setting up the Call Outcome custom field.
You should configure the custom field in Infusionsoft with values that are meaningful for your business. Call Notes saved with a Call Outcome value become very useful in creating reports for your Infusionsoft dashboard.
The Call Outcome you select here is saved into the most recent turboDial Call Note on the Contact Record for the Contact displayed in the Contact Info section.
You can also designate a Call Outcome without having made a call to the Contact. In this case a note titled ‘turboDial: Notes’ will be left on the contact record containing the same details as described above, and any corresponding Call Outcome automation goals will also be triggered.
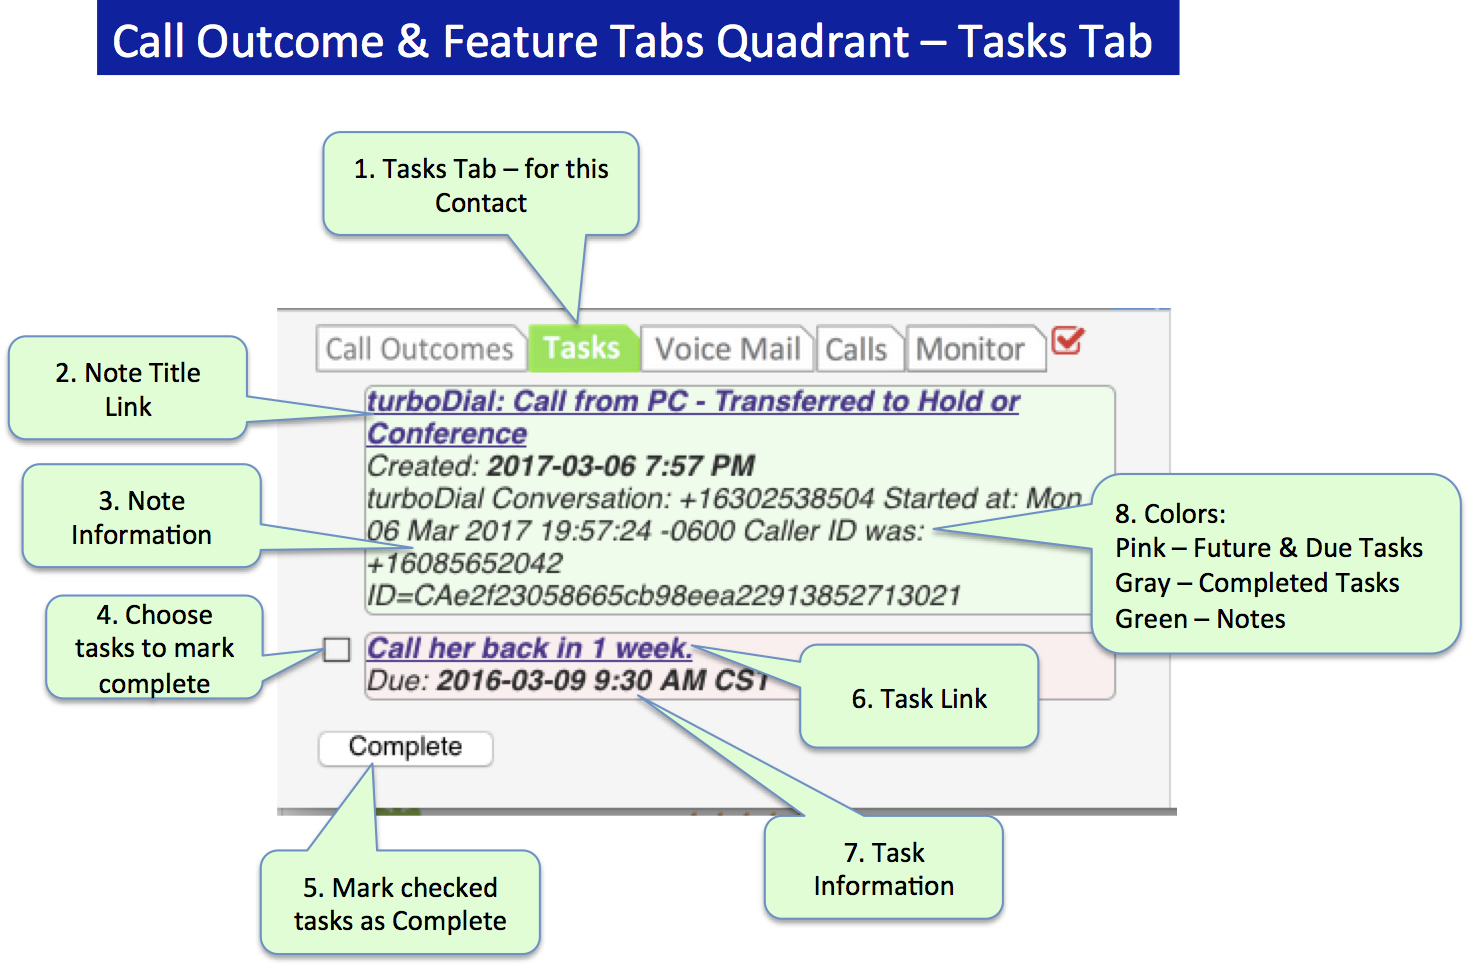
Call Outcome & Feature Tabs Quadrant – Tasks Tab
The Tasks tab is available with the Base Account and is enabled in Global Options. See Display Contact Tasks for more information. The Tasks tab operates on the currently selected Contact.
Click for Details
- Tasks Tab. The Tasks Tab provides information on Tasks and Notes for the current viewed Contact, and provides the ability to update Tasks. The tab is Green when the pane is active, and Red when the pane is not active and there is a Task that is due.
- Note Link. Clicking this link opens a window with the Note Record in Infusionsoft, which may be used to make updates.
- Note Information. The information contained in the body of the note.
- Choose Tasks to mark complete. Place a check to place a check.
- Mark checked Tasks as Complete. Clicking on the Complete button will mark the checked tasks as Complete in Infusionsoft.
- Task Link. Clicking this link opens a window with the Task Record in Infusionsoft, which may be used to make updates.
- Task Information. Contains the due date for the task.
- Colors:
- Pink: Future & Due Tasks
- Gray: Completed Tasks
- Green: Notes
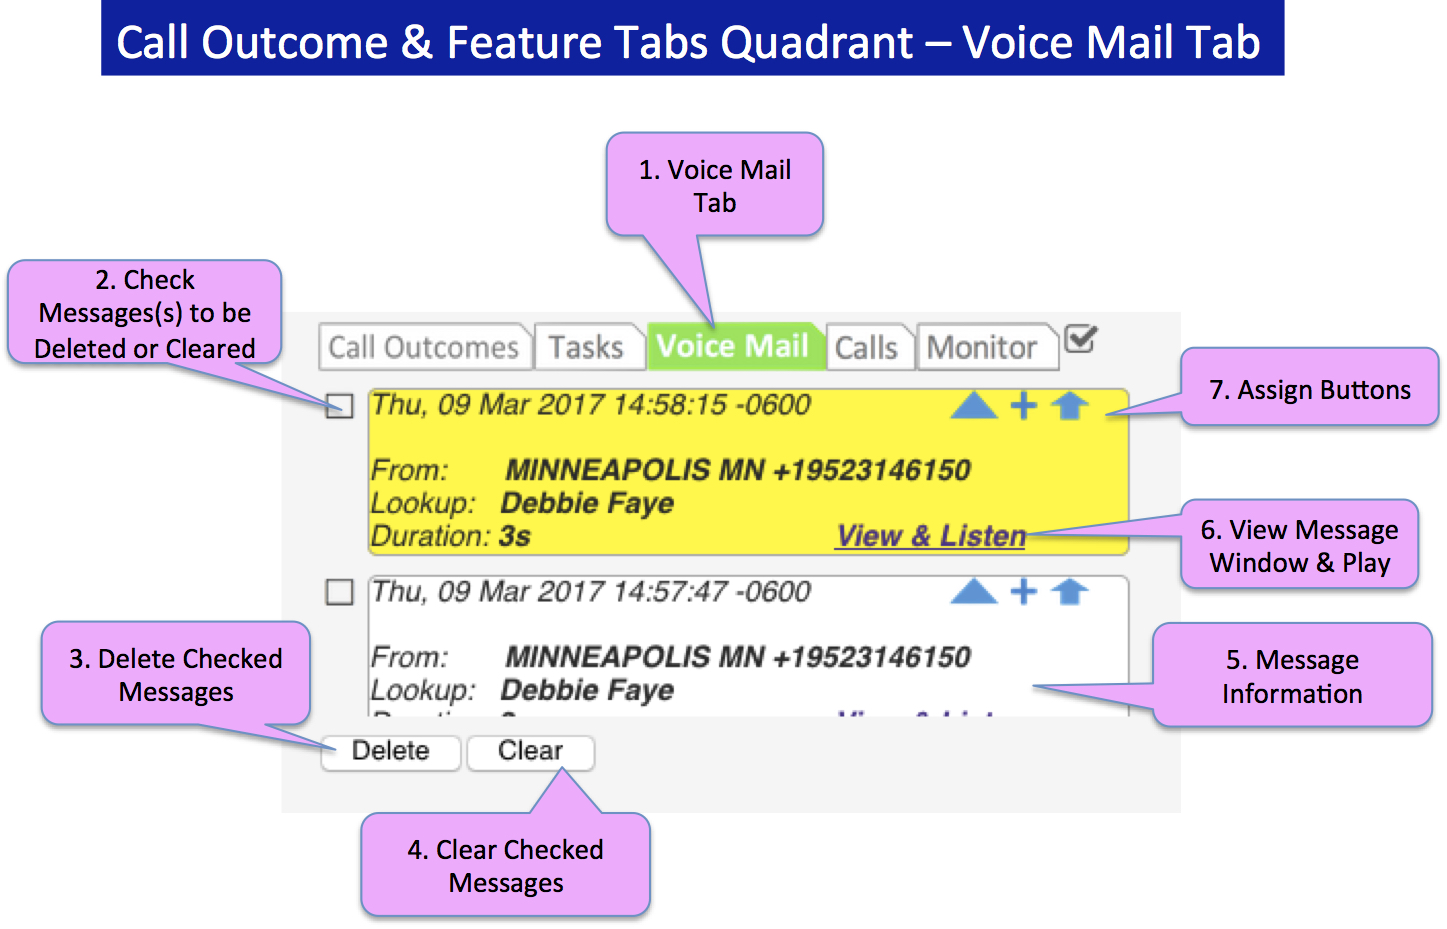
Call Outcome & Feature Tabs Quadrant – Voice Mail Tab
The Voice Mail Tab in the Call Outcome & Feature Tabs Quadrant operates on Voice Mail messages owned by the User that is logged-in. For more information, see Voice Mail.
Click for Details
- Voice Mail Tab. Select the Voice Mail Tab to see Voice mail messages owned by the User that is logged-in. The tab is Green when the pane is active, and Red when the pane is not active and there is a new Voice Mail message.
- Check Message(s) to be Deleted or Cleared. Select the box to place a check.
- Delete Checked Messages. For the checked messages, deletes the Voice Mail notification in the turboDial Voice Mail pane, the recording link in the Infusionsoft Note record, and the recording in Twilio.
- Clear Checked Messages. For the checked messages, deletes the Voice Mail notification in the turboDial Voice Mail pane, but retains the recording in Twilio and the link in the Note Record.
- Message Information. Includes Date and Time, From information provided by the telephone company, Contact Lookup information in Infusionsoft and message duration.
- View Message Window & Play. Displays a new window to Play and/or Delete a message, and also include transcription (if chosen when setting up Voicemail).
- Assign Buttons. This information is also contained in Assign Buttons.
- Blue Triangle: View. Click this button to view the Contact who has been assigned. Assign yourself as the note owner. But, if it is already assigned to a User, then it will not be reassigned to you.
- Blue Plus sign: Add. If the note is not assigned to a Contact (or assigned incorrectly) and the Contact does not exist, then click on this Add button to create the Contact and assign the note to that new Contact. The Add button will also assign yourself as the note owner.
- Blue Up Arrow: Re-Assign. If the note is not assigned to a Contact (or assigned incorrectly) and the correct Contact does exist, then click this Re-Assign button to change assignment of the note to the currently viewed Contact. The Re-Assign will also assign yourself as the call note owner.
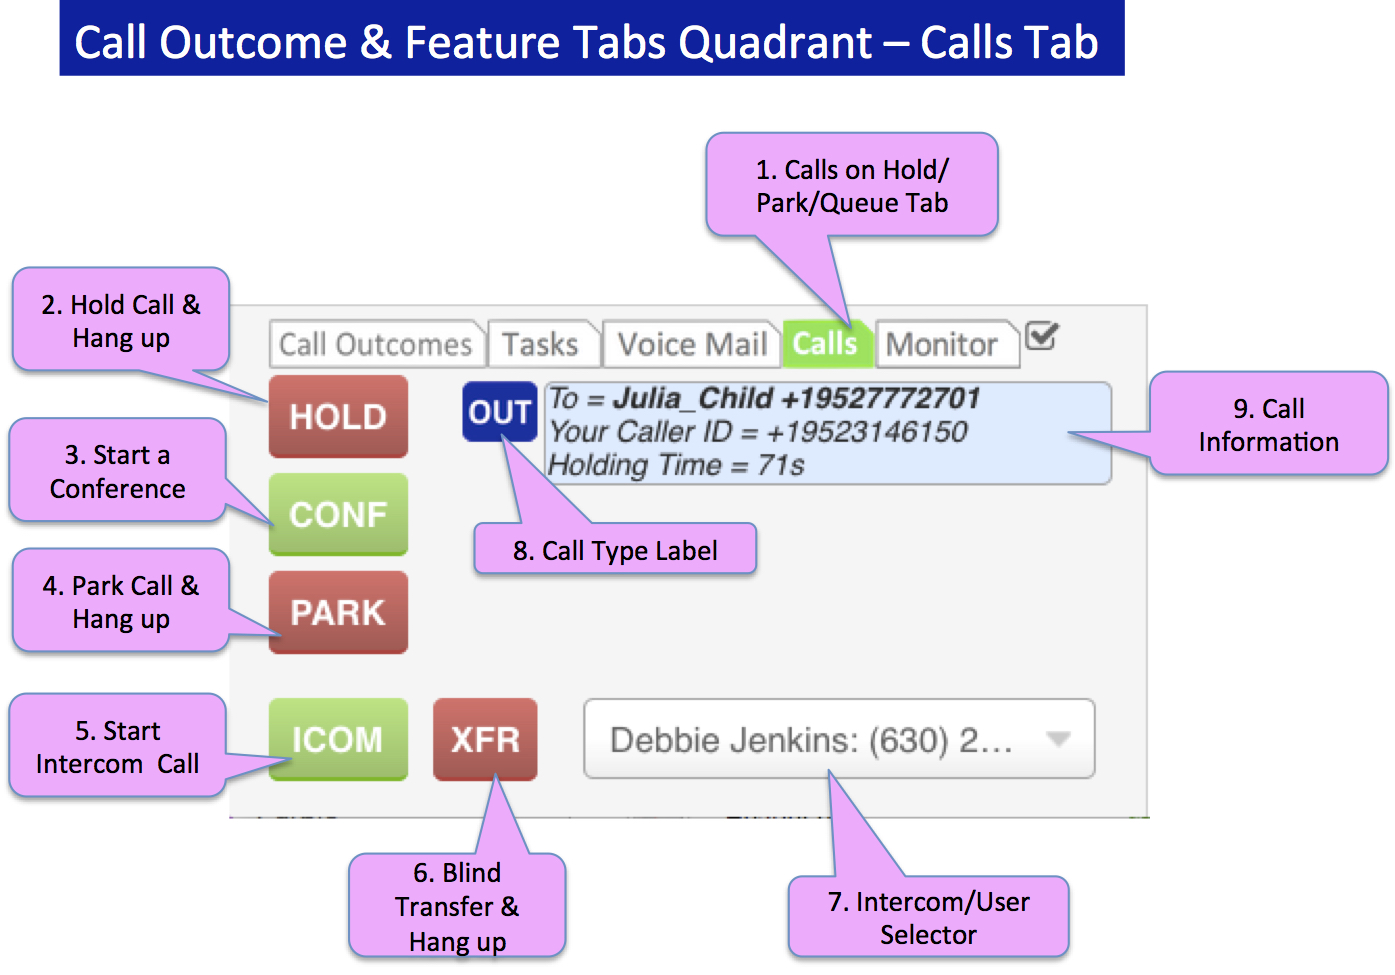
Call Outcome & Feature Tabs Quadrant – Calls Tab
The Calls Tab in the Call Outcome & Feature Tabs Quadrant shows buttons for actions that may be taken on active calls for the User that is logged-in. It also shows calls that have been placed on Hold, Parked or Queued. See Call Handling for more information on how to set up and use the following features.
Click for Details
- Calls on Hold Tab. The Calls Tab shows buttons for actions that may be taken on active calls for the User that is logged-in. It also shows calls that have been placed on Hold, Parked or Queued. The tab is Green when the pane is active, and Red when the pane is not active and there is a call on Hold, Parked or Queued.
- Hold & Hangup. Press the Hold button on an active call, and the other party will hear music when the call is placed on Hold. The Note record is updated by appending ‘Transferred to Hold or Conference’ in the title.
- Start a conference. Clicking the Conference button will start a conference with 2 or more calls (active or on hold).
- Park & Hangup. Clicking the Park button is similar to the Call Hold feature, with the addition that notifications are sent to multiple designated turboDial Users, and any one of those users may Un-Park the call.
- Start Intercom Call. To start an Intercom call, choose the User and destination from the Intercom/User Selector. The User must be another turboDial user in your account.
- Blind Transfer & Hangup. The Transfer button works on an active call. Choose the User from the Intercom/User Selector, then click the Transfer button to transfer the active call to the selected User.
- Intercom/User Selector. Lists the other turboDial Users’ email and phone numbers (where available), and the check mark by their email address indicates their turboDial Logged-In Presence. Select the User from the list when using Intercom or Transfer features.
- Call Type. Identifies calls on Hold, Parked or Queued.
- OUT (Blue) – Identifies Outbound calls on Hold.
- IN (White) – Identifies Inbound calls on Hold.
- INQ (Red) – Identifies calls in Queue.
- PARK (Green) – Identifies Parked calls.
- Call Information. Identifies information such as Date, Time, Caller Name, and Wait time.
Call Outcome & Feature Tabs Quadrant – Monitor Tab (Upgrade Coming Soon)
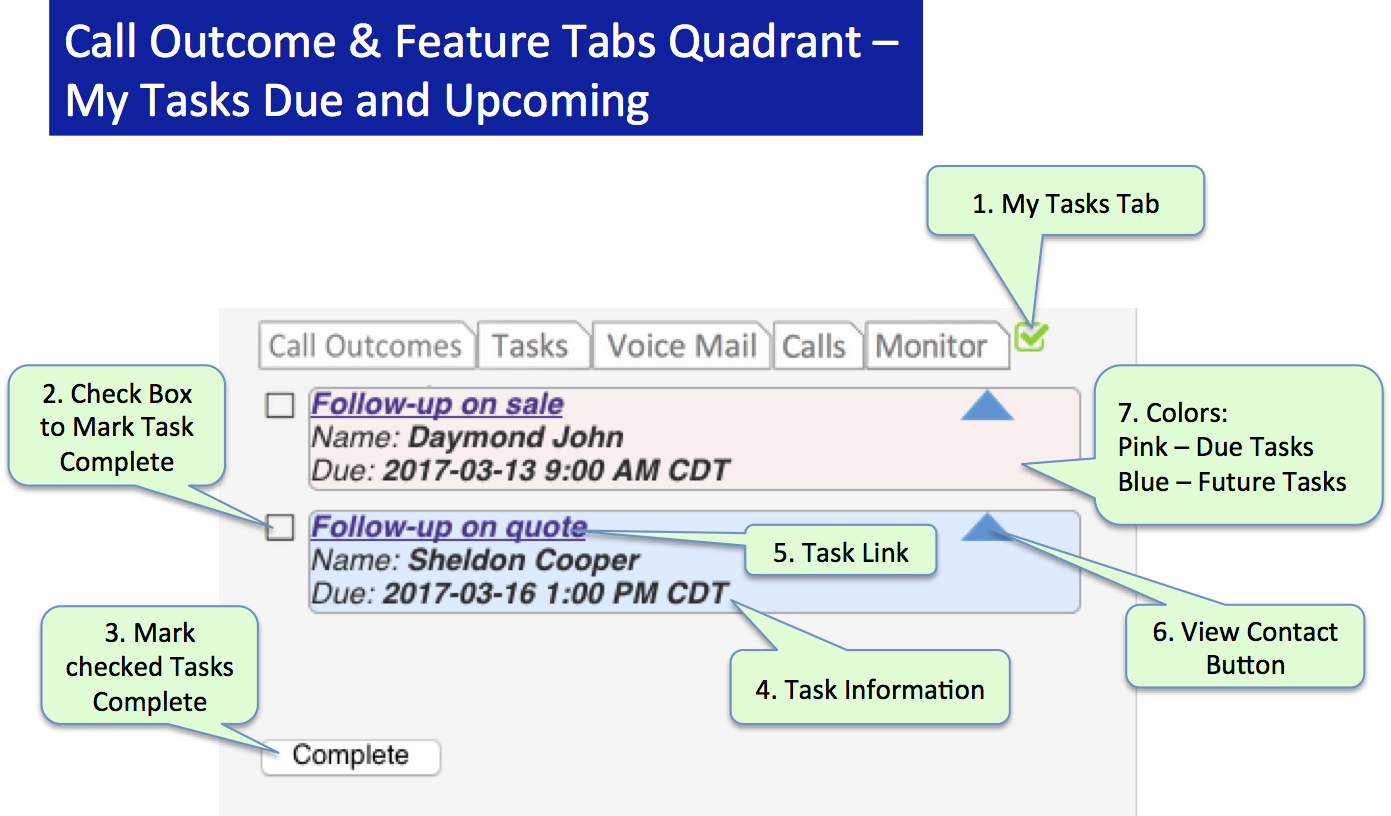
Call Outcome & Feature Tabs Quadrant – My Tasks Tab
The My Tasks Tab in the Call Outcome & Feature Tabs Quadrant provides quick access to the tasks owned by the Logged-In turboDial User, and is enabled in Global Options.
Click for Details
- My Tasks Tab. The My Tasks Tab provides the ability to view and operate on the Due and Future tasks for the User logged in to turboDial. The tab is Green when the pane is active, and Red when the pane is not active and there is a Task that is due.
- Check Box to Mark Task(s) Complete. Select this box to place a check.
- Mark Checked Tasks as Complete. The checked task(s) will be marked complete in Infusionsoft, and will include the date and time.
- Task Link. A link with the task name, and when clicked a new window is opened for the Task Record, which may be used to make updates.
- Task Information. The Name of the Contact and the due date and time for the task.
- View Contact Button. Blue Triangle – View. View the Contact who is associated with the Task.
- Task Colors:
- Pink – Due Tasks
- Blue – Future Tasks